Course Copy Guide
Table of Contents
Best Practices
Best Practices: Post Course Copy
Course Copy Process
Duplicated Course Menu Links
Reordering Course Menu Items
Moving Course Items to a Different Folder
Course Entry Point
Best Practices
When copying an old course over into the new course shell, there are some best practices you should adhere to ensure the desired results.
- DO NOT copy the course more than one time! Doing so will result in the Source Course (course copied) to be duplicated into the Destination Course (Course shell)
- Check the Course Menu for duplicated items (see Duplicated Course Menu below). This is a must to eliminate course navigation problems for your students.
- Pay particular attention to Step 8 to eliminate copying old discussions into the new course.
- See instructions for Moving a Course Menu Item /Folder to a Different Location below to move or copy individual items from one course to another.
- Set Course Entry Point
Best Practices: Post Course Copy
Complete the course copy process by removing old and unused items from their perspective areas. This will reduce the course storage space on the Blackboard server and will enhance responsiveness when you and your students are working in the course. Performing the best practices will also eliminate confusion for you and your students if unused items, files, etc., remain in the course and are visible to new students.
-
Course Content Collection (Files must be deleted inside the Course Content Collection area, just in the content areas such as Course Documents or Assignments).
- Files such as old syllabi
- Power Points
- Word documents
- Images
- Excel files
- Other unused items
-
Course Documents
- Lecture Notes that are no longer relevant to the current course.
- Items containing information and files no longer needed in the course
- Hyperlinks
- Remove in irrelevant to the course
- Fix the links if they no longer work
-
Assignments
- Writing
- Discussion Board
- Journal
- Blogs
- Wikis
- Tests
-
Tests, Pools, and Surveys
- Old Tests that are no longer used in the course
- Old Pools that are no longer used in the course
- Old Survey that are no longer used in the course
Course Copy Process
In this process, you will enter the course you wish to copy (course to copy from, ie, source course), then select the course to copy the content into, select the course to copy to, make you Copy Options, and click Submit to complete the process.
Note: you must be instructor in both courses and both must exist on the current Blackboard server.
1. Log in to Blackboard
2. Log into the Course that you wish to use to be copied (from). This is the course you want to copy.
3. Go to Course Management / Control Panel / Packages and Utilities, and select Course Copy.
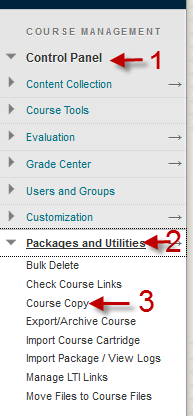
4. In Package and Utilities, under the SELECT COPY TYPE, click the down-pointing chevron and select “Copy Course Materials into an Existing Course”.
5. In the SELECT COPY OPTIONS section, and Destination Course ID, click the Browse button.

A Courses pop-out menu will display, and all the courses where you are enrolled as an instructor will be displayed.
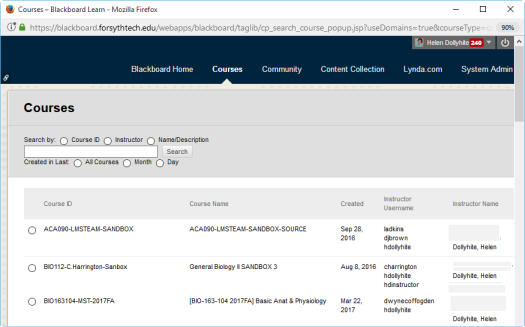
6.Select the Destination Course ID (course copying into, by clinking the radio button, (circle) beside of the course you want to copy into, and click the Submit button.
Note: Make sure you select correct destination course. In most cases, the destination should be empty shell.

7.Under the Select Course Materials section, click the Select All option. (you can select you only want specific areas).
Note: Be cautious when copying only selected areas, especially with items that may have associated grades and/or rubrics.
8.Under Discussion Board (option), it is recommended to Select “Include only forums, with no started posts”.
Note: Selecting “Include starter posts for each thread in each forum (anonymized)” will cause all forum posts for all Discussion Board Forums to be imported/brought into the new course. The Authors post will be set to Anonymous.
9.In the FILE ATTACHMENTS section, use option “Copy links and copies of the content” for most courses, and click the Submit button.
Note: For courses with Softchalk and/or Course Content Management, the CTL department should be contacted before copying)
10. IMPORTANT: You will receive an email after the course copy process has completed. DO NOT WORK IN THE COURSE UNTIL YOU RECEIVE THIS CONFIRMATION EMAIL

Duplicated Course Menu Links
1.After course copy process is completed, you should go into the new course and review the Course Menu.
Note: Some Course Menu items may be duplicated and include empty menu items.
2.If duplicated menu items exists, you can identify the empty items buy the small grey box to the right of the menu named.
3.To delete the empty menu item, hover over the link, then click the down-pointing chevron, and select the Delete option.
4.The “Are you Sure Window” will popup. Click the Delete content option.
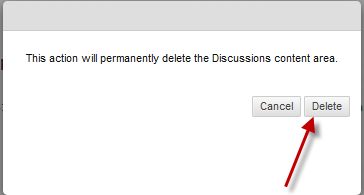
5.The delete confirmation window will pop-up again with the message “This action will permanently delete the Discussions content area”. Click the Delete button.
Reordering Course Menu Items
1.To move a Course Menu item to a different location, hover over the menu item. The item will change colors and you will see a light yellow rectangle on the left of the link. Place you mouse on the yellow section. Your arrow will change into a cross-hairs icon. While holding down the left mouse button, drag the item to the new location in the Course Menu.
2.When the item is positioned in the desired location, release the left mouse button. The item is now is in the new position in the Course Menu.
Moving Course Items to a Different Folder
Sometimes, the duplicated Course Menu items both will contain information that you need in the new course. To solve this problem, you will have to move the items into the correct area.
1.Locate the items in the Content Area. Click the drop-pointing chevron beside the item to be moved.

2.Click the Move option on the pop-out menu.
3.On the Move page, use the Destination Course drop down menu to select the course you would like to move to.
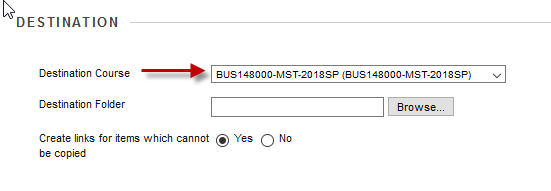
4.Click the Destination Folder Browse button.
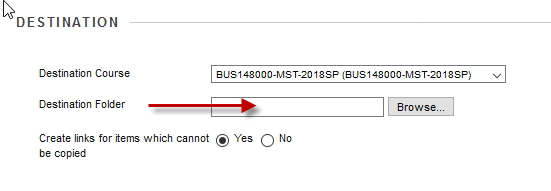
5.Select the area in your course you would like to place the item or folder. You may click the Plus Sign + button to find another folder within a folder.
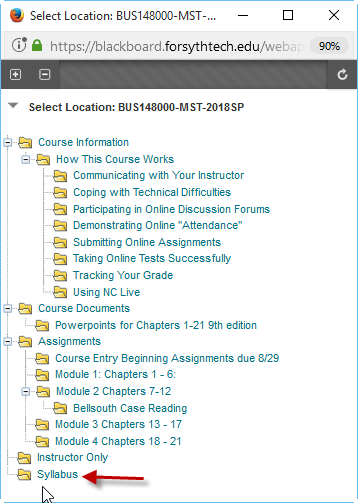
Click the Submit button.
Course Entry Point
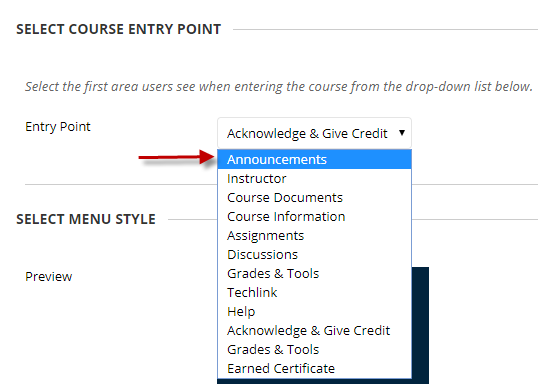
When a user enters a Blackboard course, the first page they see is the course’s “entry point”. By default this is set to be the announcements page. If you wish, you may change your course’s entry point to be a different menu item within your course. Depending on the course entry point of the source course and the destination course, the course entry point may change. Follow these directions to set the Course Entry Point to the correct area.
1.Go to the Control Panel > Customization > Teaching Styles.
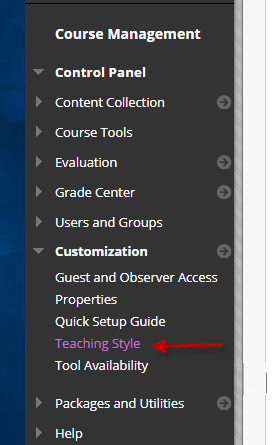
2.Scroll down to the SELECT COURSE ENTRY POINT section.
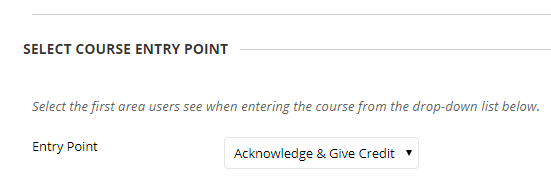
3.From the drop-down menu, select the page you want to be the Course Entry Point.
4.Click the Submit button in the bottom right corner to save the changes.